
How to Use the Blur Tool in Photoshop
When editing a photograph, a blur filter can make the image look less sharp edges appear softer. Using the blur tool to remove noise from an image can help you fix an old photo that is wrinkled and unflattering. To use the blur filter effectively, you need to first cut out the object you want to blur. This will yield the best results. Then, apply different blur lenses to your picture.
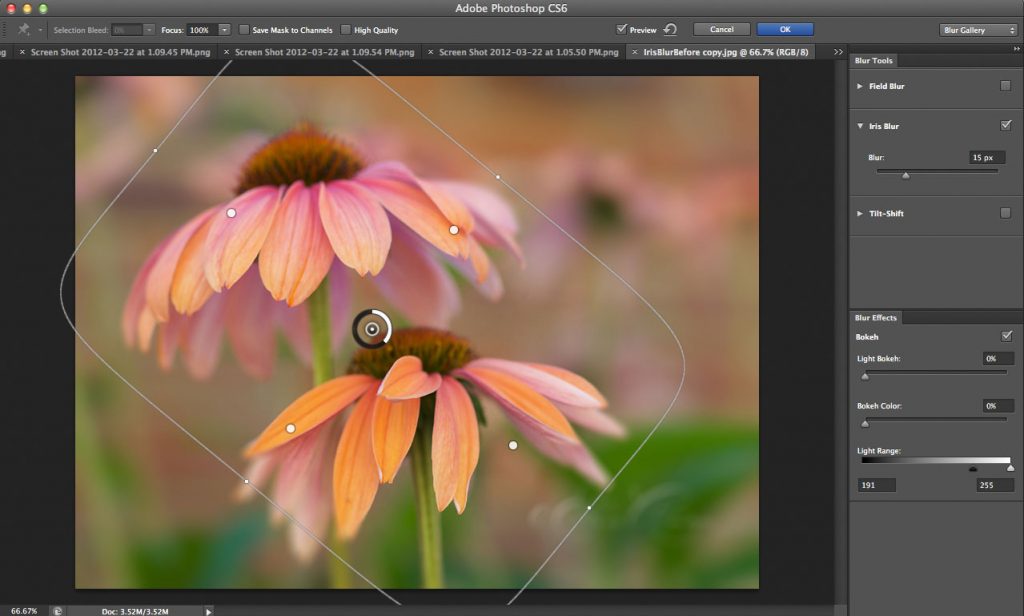
Field Blur simulates the focus pattern created by using a tilt-shift lens
Tilt-shift lenses create a shallow depth of field effect. When combined with the right lens, the effect can create a miniature model of a normal street scene. While tilt-shift lenses can be expensive, a relatively simple technique will create a miniaturized effect. Lightroom and Photoshop have tools that mimic this effect. Here’s how to apply them to your images:
A tilt-shift lens produces a shallow depth of field that is difficult to control with post-production. While you can simulate shallow DoF, you can’t accurately reproduce the sharpness of the region where the object lies. A tilt-shift lens has a 10-mm maximum shift. An example is a model train photograph, where the focus plane follows the train. The background, however, begins to blur from left to right.
In Photoshop, you can also apply different blur effects with the Blur Gallery. This tool lets you choose the overall style of the blur, while Bokeh allows you to define multiple points and different degrees of blur. Tilt-Shift and Field Blur allow you to create different bokeh effects for each subject in your photo. The Blur gallery also provides a full-size preview of each effect.
Gaussian Blur gives you more creative flexibility than other blur tools
When using Gaussian Blur, you can focus on a specific part of the image. However, you can also blur a portion of the image with the Threshold and Radius options. Regardless of your choice, you’ll still have an interesting look that’s a little blurry. To apply this effect to an image, duplicate it and move it to the top of the document. After you’ve applied the Blur filter, you can apply the high pass filter from the Filters menu.
The Gaussian Blur filter is found under Filter -> Blur. It is the only blur tool in Photoshop that doesn’t use a lens. It is also quite different from Lens Blur, which relies on a weighted average of nearby colors to make the final effect look blurry. This gives you greater control when creating digital photo collages, which are very popular with photographers and are challenging to learn.
Field Blur radius of 70 is a good choice
A Field Blur radius of 70 is a common setting for most photographers. The blur tool can be used to smooth out the entire photo, or to selectively blur a portion of it. It blurs the background and foreground image equally, giving the picture a textured, smoky look. This effect was first developed in the 1800s by German mathematician Carl Friedrich Gauss.
When using the blur tool in Photoshop, use the default settings or experiment with different values to see which one works best for you. Field Blur is best used when you want to focus on one part of an image. Try it out on a background, foreground, or pins. You can also apply it to Smart Objects to create a custom effect.
When using the blur tool in Photoshop, you should use a high quality image. Choose an appropriate background for the blurring process. In Photoshop, you can also choose a high-quality image by using the best resolution. Choosing a low-resolution image will cause the blur effect to look grainy. A high-resolution photo will appear more natural and will give you a sharper image.
Lens Blur allows you to apply different blur lenses to your picture
To apply different blur lenses to a picture, first you must apply the layer mask filter. Then, you can choose the color for the blur, and the type of noise you want to apply to the picture. In Photoshop, this filter applies directly to the selected layer. You can also use the selection method to create a depth map. You must set a mask in the Layers panel before you can apply the filter.
You can also choose the shape of the blur. You can choose a circle, a hexagon, or any other shape. Then, you can rotate or reduce the preview to see how the blurring looks. If you want to apply the same blur lens to different pictures, you can set the depth map to define the plane of focus and adjust the Radius as necessary. Depending on the type of blur you apply, you can create the depth map with the use of alpha channels or layer masks.